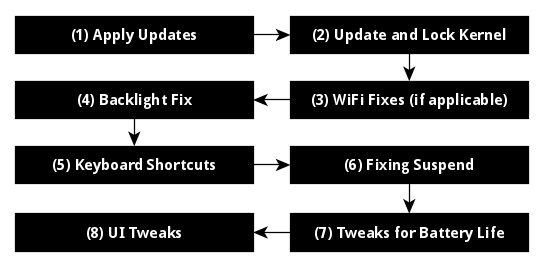
Part 3/3: Post Installation Phase
< Part 1/3 – Introduction | Part 2/3 – Installation >

This final post will guide you through my post-installation tweaks for Lubuntu 14.04/14.10.
What should work out of the box? Pretty much all hardware except for the mouse. The top rows of the Keyboard are mapped to the function keys F1 to F10 by default (except for Esc and Power Off which retain their original functions), while the Search Key is now mapped to the ‘Meta’ or ‘Windows’ key. The WiFi might be spotty for some users – if you have trouble installing updates for the next step, go to Step 3 to fix the WiFi and then return to Step 1.
What you should be familiar with before working in Debian/Ubuntu/Linux: the terminal, apt-get and the kernel.
Step 1: Apply all Software Updates: this can be done via the GUI or via the terminal. The terminal commands to first update your repository information and then install updates are:
sudo apt-get update
sudo apt-get dist-upgrade
Reboot if necessary (i.e. if new firmware or kernel updates are installed).
Step 2: Install a Newer Kernel: Updating the kernel can be done manually through some simple terminal commands. Updating the kernel to version 3.17 or later will add hardware support for both the mouse and the touchscreen (for C720P users). Additionally, there is a bug report of graphics hangs while using the current vanilla kernel. An important fix has been applied for kernel 3.19 and later, which is due out soon. In the meantime, I recommend installing a special kernel tweaked by Hugh Greenberg with patches for fixing the graphics hangs. Download it from his github repository here (you only need to download the two .deb files) into a new folder, use the terminal to navigate to the folder and install both .deb files by running:
sudo dpkg -i linux-headers-3.18.0-ctx.patch_3_amd64.deb linux-image-3.18.0-ctx.patch_3_amd64.deb
Once these packages are installed, reboot the machine and marvel at the new-found functionality of your touchpad! And, f applicable (but to a lesser extent), your touchscreen! You should also prevent the kernel from being updated via the update process. In order to do this, we install aptitude and “lock” the package from being upgraded:
sudo apt-get install aptitude
     sudo aptitude hold linux-headers-3.18.0-ctx.patch linux-image-3.18.0-ctx.patch
Step 3: WiFi Fixes: some users have reported spotty WiFi depending on the type of network they are using. Furthermore, bluetooth and WiFi performance may suffer if both are used simultaneously. The fix for this is also simple. You need to create a text file called ath9k in the directory /etc/modprobe.d and add a few lines of text. However, /etc/modprobe.d/ is a folder that you are required root privileges to write to, so open up a terminal and we’re going to use sudo with the nano text editor to create and modify this file:
sudo nano /etc/modprobe.d/ath9k.conf
Now, a notepad-like interface should be visible in the terminal. Write the following into the file:
options ath9k btcoex_enable=1 bt_ant_diversity=1 ps_enable=0
Press Ctrl+X and then Y to save changes and exit.
Step 4: Backlight Fixes: We will need to install the xbacklight utility in order to make our brightness keys work. Install the xbacklight package in the terminal:
sudo apt-get install xbacklight
Step 5: Keyboard Shortcuts: These can be modified via the file lubuntu-rc.xml in your home directory: ~/.config/openbox. Read here on how to configure this file to create or modify keyboard shortcuts. I mapped the following keys:
 Shortcut                                  Command
----------  ---------------------------------------------------------------------
Meta+F10:  pactl set-sink-volume alsa_output.pci-0000_00_1b.0.analog-stereo -- +5%
Meta+F9:   pactl set-sink-volume alsa_output.pci-0000_00_1b.0.analog-stereo -- -5%
Meta+F8:   pactl set-sink-mute alsa_output.pci-0000_00_1b.0.analog-stereo toggle
Meta+F7:   xbacklight -inc 10
Meta+F6:   xbacklight -dec 10
Alt+F2:    synapse
Synapse is a nice launcher interface that I chose to replace the default lxpanelctl run utility. Installation instructions here. My lubuntu-rc.xml file is also on pastebin if you would like to just copy and paste it.
The xfce4-notifyd daemon and xfce4-mixer packages can be installed so that changes to your volumes can be seen as a nice pop-up when the keyboard shortcut keys are pressed – remember to add xfce4-notifyd to your startup programs by going to the Main Menu > Preferences > Default Applications for LXSession.
Step 6: Fixing Suspend and Long Boot Times. A fantastic guide to this is available here. GEdit is not installed by default in Lubuntu 14.04, so use leafpad, nano or vi in place of “gedit” for applying the fixes.
Step 7: Tweaking Battery Life. With the appropriate tweaks and power-savings, you should be able to achieve battery life comparable or better than that of ChromeOS – especially if you intend to use the chromebook offline! Install powertop and TLP by the following commands (you need to add a PPA first)
sudo add-apt-repository ppa:linrunner/tlp
sudo apt-get update
sudo apt-get install powertop tlp tlp-rdw
sudo tlp start
TLP will start up automatically at every boot. Follow the documentation here to adjust settings in powertop to power savings for the C720/C720P. An important note is that in order to enable CPU scaling in the TLP config files, use the “powersave” governor instead of the “ondemand” governor.
Step 8: Additional UI Tweaks. Let’s get everything looking pretty:
- By default, Lubuntu does not have a desktop-compositor installed to support transparency and special effects. Install compton or xcompmgr for basic, lightweight effects (miniscule effect on battery life) or something like compiz \
- Various icons and themes! – A popular one is Numix.
Step 9: Enjoy your new Linux Notebook!
